Tutorials |
|
|
||
|
|
||
|
|
Before you take command of the combined world forces of your national alliance, it's a good idea to practice on some set-piece situations to learn about the controls and tactics. There are two tutorial games included with Command HQ to help introduce you to the game controls. Before you begin, locate the |
|
|
||
|
|
|
|
|
Special Keys for Safe Harbor Games |
If you
are playing under Safe Harbor
Games, you can press
the Another
useful keystroke combination when playing at Safe
Harbor Games in Windowed mode is the If you accidentally go into the Windows Desktop (perhaps by pressing Ctrl/Esc) and do not see a Command HQ game window, look down in your task bar and click on the item that says “DOSBox”, in order to get back to your Command HQ full screen game.
|
|
|
|
|
|
|
Starting |
Install: See the section on Installation for information on how to install Command HQ on floppy disks or onto a hard drive, or to run it from Safe Habor Games. Main Options: After the title screens, you'll find yourself at the Main Options menu. Select "Resume Saved War" to begin the first tutorial. Load Game: Choose "Tutorial One" to begin learning Command HQ. |
|
|
|
|
|
|
Where |
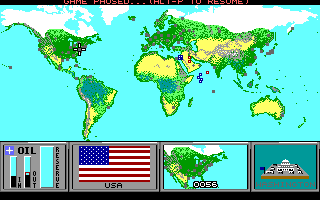
You begin in control of the blue forces, with a full view of the world situation. The top section of the screen shows the current status of the game. The tutorial begins in Pause mode to give you time to look around.
The map also shows the location of all major cities, bases, and oil fields in the world. Cities and bases are black squares and oil fields are small "+" signs. The object of any scenario of Command HQ is to capture all of the Capital Cities on the map. Oil is important in some eras, to keep the machinery of war and commerce running. The four screens below the map are called Monitors One through Four, numbered from left to right. Each serves several functions during the course of the game. Monitor One initially shows you your oil status, in games that use oil. In the tutorial, you will notice that your oil situation is critical; your income of oil is less than your total outflow, and your reserves are dropping (the word "oil" flashes red to warn you of this). The subject of the first tutorial is a blue attack on the red oil fields of the Middle East. Monitor Two initially shows the flag of the city currently under the cursor (in this case, Washington D.C.). Monitor Three initially shows the general location of your major capital city. Depending on the scenario, there may be other friendly capitals that you must also protect. During a game, as status or crisis messages are displayed, Monitor Three will show you the area of the world the message refers to. Monitor Four depicts the type of terrain the cursor is currently over.
|
|
 The map is a terrain representation of the world. Types of
terrain include sea, plains, forest, jungle, desert, and mountains. See
The map is a terrain representation of the world. Types of
terrain include sea, plains, forest, jungle, desert, and mountains. See
|
In this tutorial, we'll concentrate on the basic game controls and the elements of war; once you know how to maneuver and fight, you've learned 75 per cent of Command HQ. |
||
|
|
||
|
The Field of Battle
|
||
|
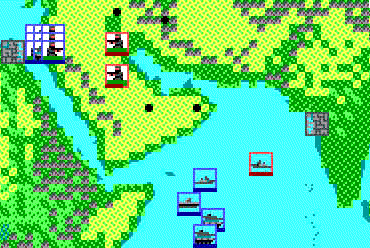
The Field Of Battle In a real game of Command HQ, the theater of war can range from a single area like Hawaii to the whole world. Part of the challenge is knowing which theaters deserve your attention, and which can be left to follow commands previously given. For this tutorial, we'll concentrate on the Middle East. Your first step is to take a close-up look at the action.
Move the cursor around and note the various
types of terrain on the map. To see the terrain underneath the units,
press As you can see from the arrangement of the blue forces, a combat unit is as large as nine map positions (three squares by three squares) - thus, units can overlap other units in tight formations. If you want to get a good look at a unit that is obscured by another, put the cursor over it and watch Monitor Four. |
||
|
The Each unit represents an army, fleet, or air wing composed of many thousand soldiers and vehicles. Each unit actually occupies only the center of its icon on the screen, but different types of units have different combat ranges, giving them different "effective sizes". Types of units in this tutorial include air, infantry, tank, cruiser, and carrier. All units except air units have several common features: Type Icon: Each unit type is recognizable by the icon in the center of the unit. A summary of icon types appears in the table listing Colors Used in the Game. Strength Bar: A unit is at full strength when the band of color at the bottom extends all the way across the unit. As the unit takes damage in combat, the bar recedes. A unit with no color bar showing is very near destruction. Background Color: A land unit has a distinctive white background color. A sea unit has a light blue background color, the same color as the oceans themselves. When a land unit boards transports and becomes a sea unit, its background color goes from white to blue to note the change. Infantry Entrenchment: Infantry armies can "entrench," making them much harder to kill. An entrenched infantry has an additional green color bar above its strength bar. If this bar is not there, the infantry is not entrenched, and is therefore more vulnerable. |
||
|
Simple Time to launch an attack! Press the Now move the cursor so that it is adjacent,
without overlapping, to the red cruiser, and press Put the cursor over the blue cruiser again, and a new message appears: "Unit Path". Watch for a moment, and the flickering image will follow the unit's new path of movement. Also note that in Monitor Four, the unit has a message appearing with it, "Moving", to let you know that that unit currently has a destination. When the opposing units are close enough to each other, they begin to fight. Hold the cursor over one or the other unit; two new icons appear in Monitor Four. The small burst symbol denotes that the unit has been hit by enemy fire; the white arrow shows the directional facing of the unit, pointing out (in general terms) with which enemy the unit is engaged. As the battle progresses, both units' strength bars begin to dwindle. When one unit runs out of strength, it is destroyed. If your cruiser is destroyed, you'll have to bring up the carrier to finish off the enemy. Select the carrier by positioning the cursor
over it and pressing As the carrier moves, you'll see two red infantry appear on the coast of India. These units were always there, but you had no friendly units close enough to see them. As your air unit (aboard the carrier) gets closer, the units appear. See the discussion of Hidden Enemies. Now take a good look at your oil situation. All your reserves are gone by now (or soon will be) and the small bar has appeared in your "out" column. This shows how much oil you will need, as opposed to the solid bar that shows how much you have. Time to do something about the oil.
|
||
|
||
|
|
|
|
|
Combat Options
|
||
|
Goals Select the topmost infantry unit in the cluster around Jerusalem. Select the topmost Iraqi oil field as its destination (if you are not sure which one is Iraqi, hold the cursor over the different oil fields for a moment, and eventually you'll see the red, white, and black Iraqi flag appear). Once the first unit has been given a destination, select the next infantry unit down and give it a destination next to but not overlapping the red infantry unit guarding the oil field in Kuwait. |
||
|
Attrition As the two infantry units move, notice that their strength bars go down. This is due to attrition. Units that cross hostile types of terrain (desert, polar, and jungle) lose part of their strength each round until they leave that terrain. Also notice that once the unit begins to move, it loses its "entrenchment" indication. At some point, you unit will capture the oil field in Iraq (an animation appears in Monitor Two). This helps the oil situation, but doesn't solve it. You still need that Kuwaiti field, but the designated unit is too weak to attack, due to attrition losses. You can also see that land units do not fight when next to each other the way cruisers did. They have shorter ranges than cruisers, and must overlap to fight. |
||
|
Repairs See how the friendly unit that captured the oil field begins to repair its losses! Units in friendly cities, bases, and oil fields regain part of their strength each round until they are fully repaired. Send the weakened unit to that oil field for repairs. Be careful, though - if you give it a direct movement order, its path will take it into combat with the red infantry. First move it due north. When it arrives, give it new orders to move east to the oil field. Note that the unit's losses cease at some point. Under normal circumstances, a unit cannot be killed by terrain attrition. You'll quickly find that two units cannot occupy the same position. Move the unit on the oil field one space to the south (into the plains, where it won't suffer from attrition). This allows the weakened unit to enter the oil field and repair.
|
||
|
Overruns Now lets experiment with some advanced movement. Select one of the tank units and give it a direct destination of an unguarded Saudi Arabian oil field. The first thing you notice is that the tank moves pretty fast. Depending on the type of terrain, tanks move up to twice as fast as infantry. As the tank closes with the enemy infantry, they begin to fight - but the tank keeps moving! This is called an overrun and is one of the most valuable abilities of tanks: they can move "through" enemy infantry (taking losses) and seize objectives in the rear. Once the tank reaches the oil field, it will stop and begin to repair. |
||
|
Pinning Now try the same thing with an infantry unit, and see how the infantry becomes pinned in combat (once it's engaged, hold the cursor over the unit to see the message). Being pinned means the unit cannot move until the combat is over, or until the unit is given fresh movement orders. See the section on Movement in the Games Controls chapter. In general, infantry are far less mobile in combat than tanks. Meanwhile, send the tank to capture the last unguarded oil field, and watch the oil reserves begin to rise.
|
||
|
Advanced Combat
|
||
|
Marine Now let's look at some advanced forms of combat. Select one of the tank armies at sea (note that they are transports, as denoted by the color background) and give it a destination atop the southernmost red infantry in India. Attacking from the sea in this way is called a marine assault. The tank, although it can still defeat the infantry, takes heavy losses. Watch as the tank background turns white to show it has reached the coast. |
||
|
Navy One way to lessen losses against coastal defenders is to soften them up with navy guns. Move the carrier to just off the coast of Bombay, and watch as it begins to bombard the red infantry. Meanwhile, let's get ready to attack the red infantry in Kuwait. We have two infantry nearby to make the attack, and they could probably take the position, but with heavy losses. We can make things easier with air strikes and a paradrop. |
||
|
Air Press Air strikes can be unsuccessful, due to
ground-based defenses. If your air strike fails, press A successful air strike costs the defender half of his current strength. Quickly, before he begins to repair, attack with your nearby infantry. To attack, all you have to do is move your unit so the two icons overlap. As combat is joined, place the cursor over the defending red unit. You'll see the enemy infantry "turn to face" the attacker, as designated by the arrow that appears in Monitor Four on your screen. Since the enemy unit is facing north, a flank attack from the west will do additional damage, but sending a unit from Jerusalem over land will be slow, and the unit will suffer attrition. |
||
|
Airdrops Instead, let's do an airdrop.
Press Once the enemy is defeated, don't forget to move one of the units onto the oil field, and send the other elsewhere for repairs. A traffic jam may result in the north; see if you can get everybody to a safe destination (friendly units may move through each other, though they may not stop to occupy the same space at the same time). |
||
|
Dogfights Time to capture Bombay. The enemy unit there is weakened by the bombardment, so select your remaining tank at sea and land it on the coast of India. Once it's there, send it into the city. While the tank moves, press Try to coordinate your air attack with the arrival of your tank. In a real game, negating your opponent's air unit can be vitally important. |
||
|
City Now watch as the tank moves into the city. Do you see it take damage even after the enemy unit is destroyed? This is because enemy cities have a small militia which defends them from conquest. This militia in enemy cities is not very potent, but it can kill a weakened unit trying to capture a city. The militia in neutral cities are more potent, taking away almost half of a unit's maximum strength. Once you've captured Bombay, press |
||
|
Ending You've now learned most of the controls you need to play Command HQ. Try experimenting with various combat tactics on the remaining red unit. Try air strikes, bombardment, tank overruns, and flanking attacks with paradrops. If you give a command that doesn't seem to be working properly (for example, you might find yourself stuck with an airplane-shaped cursor), press the Escape key multiple times. When you're ready, press
|
||
 Use the
|
|
|
|
|
|
|
|
In this tutorial, the enemy troops will be moving. Although there is no "artificial intelligence" (enemy troops are simply responding to orders previously given, before the tutorial started), you'll get an idea of what it's like to play in real time, against an opponent who is changing the conditions on the battlefield. |
|
|
|
|
Pause |
You'll probably want to use |
|
|
|
|
Getting |
To begin the second tutorial, return to the
Main Options menu, either by pressing When you get the Main Options menu, select "Resume Saved War", and choose "Tutorial Two". The game begins in Pause mode.
|
|
The Situation
|
|
|
|
The purpose of this tutorial is to give you an idea of how the game is played against a live opponent. There are red units out there, moving, but you can't seem them at the start. You begin with a large convoy headed for Europe, with the purpose of establishing a beach-head and retaking the captured continent. This is similar to actions that could occur late in a World War III scenario. |
|
|
|
|
Show |
Press Press |
|
|
|
|
Oil |
Now check your oil situation. You can see that your income and outflow are about equal. Watch your reserves during the course of the battle to see if you are having any problems. You can also check on your opponent's oil
situation (spies and reports keep you abreast of his condition). Select
the |
|
|
|
|
Strengths |
You can check on how many resource centers you
own (cities, oil fields and bases), how many units you have, and your
income. First select the You can also find out your overall
strength. Press Press You can also find your relative income by
selecting the
|
|
Getting Moving
|
|
|
|
|
|
Initial |
At this point your opponent is probably getting
impatient, so press Now press For now, give your orders at speed 0. Your objective is to land your convoy in Europe. Give your transports and cruisers destinations in either Spain, the west coast of France, or England (or any combination you wish). You can keep track of which units have already received orders by holding the cursor over the unit for a moment. The unit icon that appears in Monitor Four will have a "Moving" message printed above it if the unit has already received the orders it needs. |
|
|
|
|
Movement |
Once you've given orders to all your units,
press the You can find an individual unit's movement orders by holding the cursor over that unit for a second or two. The unit's path appears as a blinking cursor moving across the map. You can only see the first three moves of an enemy unit. |
|
|
|
|
Movement Waypoints |
If you look at a unit’s movement path and it does not follow the path you want or expect, you can specify a more precise path by defining movement waypoints. That is, you can tell the unit to go to point A, then from there to go to point B, and then to point C, and finally to it’s ultimate destination. Up to 4 points can be defined for a unit’s path.
To define waypoints, give the
first movement order, and after you specify the destination point using
Using this technique, you can gain finer control for the path a unit will take to get from here to there, by specifying some intermediate points along the way.
Note that just like when you specify a single destination, if you capture an enemy or neutral City, Base, or Capital along the way, the unit will be redirected towards the center of the City, and the destinations are forgotten. Oil wells, however, can be taken simply by moving across them, and will not cause subsequent orders to be erased.
(The Movement Waypoint feature was added in Version 2.1, so players of the older versions of the game may need to practice this very useful technique.) |
|
|
|
|
Move |
Now, get your convoy moving by pressing
|
|
|
|
|
|
|
|
Radar |
Each type of unit has a scanning range. (For a table listing the scanning ranges of each unit, see the table entitled Firing and Scanning Ranges.) As your convoy moves toward Europe, enemy units will appear when they are within radar scanning distance of your units. Your best recon units are your air units. Their scanning range is very large, as long as the plane is active (not being used for a mission, or recovering from a mission). If you use all your air units, enemy troops may disappear from the screen until your air units are ready again. Radar and air recon happen automatically. |
|
|
|
|
Satellite |
Your observation satellite shows you all enemy units within its radius (except submarines, which remain hidden). By moving the satellite, you can get very good reconnaissance on enemy positions. The down side is that moving the satellite uses fuel, and eventually it will fall from orbit (see the section on Satellites). In the tutorial there's no need to worry about that, so let's get some reconnaissance. Press Select your satellite and give it a destination
over Europe. It will begin to move, and as it does you'll see any
enemy troops (except subs) within its observation radius. Press |
|
|
|
|
Submarine |
Submarines are always hidden from air and satellite scanning, and stationary subs can't be spotted on radar. The only way to find an enemy sub is if it moves within radar range of one of your units, enters one of your cities' dock areas, or if one of your units runs into it. Transports are fragile when facing subs, so watch out for enemy sub activity in the Atlantic! |
|
|
|
|
What |
Since your units are hidden as well, it's important to know which of your troops the enemy can and can't see. Your radar detectors and ECM capabilities make it easy for you to find out which of your units are hidden and which are not. Press |
|
|
|
|
Satellite |
When your convoy is halfway across the Atlantic
(about round 7-10), you may want to pause. It's time to knock that
enemy satellite out of the sky before it gives away your invasion
plans. Press The cursor becomes a selection point, asking you where to target the killer satellite. Select a destination very close to the red satellite. Make sure your own recon satellite isn't too close to the kill point or it will be destroyed too! If necessary, move it away. You'll see the satellite killer appear over the central U.S. It moves quickly across the globe to kill any satellites in its radius of effect; it will go off only when it reaches the designated destination. If your opponent moves his satellite, you'll have to give your killer a new destination. For now, get back to the war by pressing
|
|
The Invasion
|
|
|
|
|
|
Crisis |
Whenever your units engage for the first time, or you spot an enemy, or a unit is destroyed, a crisis message appears at the bottom of the screen, and an animation may appear in Monitor Two. At the same time, Monitor Three shows the area of the world in which the crisis is taking place. Put the cursor in Monitor Three and press |
|
|
|
|
Combat |
When enemies appear, fight them as quickly and as economically as possible. Keep the following tactics in mind. Attack Ranges: Subs have short attack ranges, Carriers have long ranges. Use your weapon types to their best advantage. (See the table on Firing and Scanning Ranges.) Engagement: An enemy can only fire at one of your units at a time. Once he's engaged with one of your strong units, you can attack with your weak units without fear of loss (but make sure your timing is right!) Air Strikes: Practice with air strikes, and remember that you can find out when an air unit will be ready by selecting the unready icon. Enemy Movement: You can determine the short-term destination of an enemy by holding the cursor over the enemy unit. |
|
|
|
|
The |
At some point you'll see the message that a recon
satellite has been killed. Press |
|
|
|
|
Deploying |
When you've taken care of the defending sea units, it's time for a landing. To demonstrate the power of nuclear weapons, we'll start our invasion with a nuclear strike. Press Your use of nukes will also cause some cities
on the board to change allegiance. Press |
|
|
|
|
Foreign |
Foreign Aid is used mostly in the pre-game and cease-fire portions of Command HQ. However, foreign aid can be used even during war, where it represents direct shipments of money and personnel, diplomatic missions, support for rebel factions, and propaganda and subversion. To use foreign aid, press |
|
|
|
|
Buying |
Press When placing a unit, each friendly city is
highlighted with a colored box. The box is green if the city is
available for building, yellow (or white, see Colorblind Mode) if the city will
soon be available, and red if the city will not be available for a long time.
You can find out when an unavailable city will be ready by placing the
cursor over the city and pressing Try building several units and placing them in various areas on the map. |
|
|
|
|
Mopping |
You can experiment with various tactics and
moves, as in the first tutorial. When you're ready, press |
Next Chapter: Game Controls